Before you study how to build a web app, you must imagine the result. Before you start coding you must set the goals, imagine the whole project and decide what the folders structure will be, and which files you will need. In this case, the goal is very easy: to build your first web on PHP with the possibility of users registration, login, and logout, and with the possibility of making users changes.
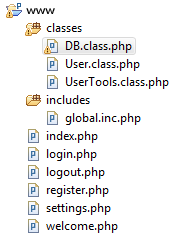
The structure of Files and Folders
If you wonder how to build a web application you must know that OOP PHP programming uses classes and objects to do necessary application operations. For our project, we will create 3 classes. The first class is User (will contain information about the user with a simple save function save()), the second one is UserTools (will contain functions that users need, such as login(), logout() and others…), the third one is a database class (it will serve as a liaison – connecting to the database, making changes, inserting new rows, and more).
In addition to the classes, we will also use a file called global.inc.php. This file will be called from each page and perform common operations that we need. For example, in this file, we will implement a DB connection on the each page.
The other files are needed for user pages: index.php, register.php, login.php, logout.php, settings.php and welcome.php.
[announce]
Here is how the basic structure will look like:
Creating the Database and users table
Your server should have MySQL installed. First, we need to create a new database for your application. In this database, create a users table. The following SQL code can be used:
CREATE TABLE IF NOT EXISTS `users` (
`id` int(11) NOT NULL AUTO_INCREMENT,
`username` varchar(50) NOT NULL,
`password` varchar(50) NOT NULL,
`email` varchar(50) NOT NULL,
`join_date` datetime NOT NULL,
PRIMARY KEY (`id`),
UNIQUE KEY `username` (`username`)
) ENGINE=MyISAM DEFAULT CHARSET=latin1;
Primary key acts as the “id” and this is what we will use to identify our users.
We will also have a unique field – a “username”. Other required fields are “password”, “email”, “join_date”.
Creating a DB.class.php class
The aim of this class is very simple: to reduce the use of SQL for accessing the database as much as possible and arrange the data in a convenient format.
Here is the code:
<?php
//DB.class.php

class DB {

protected $db_name = 'yourdatabasename';
protected $db_user = 'databaseusername';
protected $db_pass = 'databasepassword';
protected $db_host = 'localhost';

public function connect() {
$connection = mysql_connect($this->db_host, $this->db_user, $this->db_pass);
mysql_select_db($this->db_name);
return true;
}

public function processRowSet($rowSet, $singleRow=false)
{
$resultArray = array();
while($row = mysql_fetch_assoc($rowSet))
{
array_push($resultArray, $row);
}
if($singleRow === true)
return $resultArray[0];
return $resultArray;
}

public function select($table, $where) {
$sql = "SELECT * FROM $table WHERE $where";
$result = mysql_query($sql);
if(mysql_num_rows($result) == 1)
return $this->processRowSet($result, true);
return $this->processRowSet($result);
}

public function update($data, $table, $where) {
foreach ($data as $column => $value) {
$sql = "UPDATE $table SET $column = $value WHERE $where";
mysql_query($sql) or die(mysql_error());
}
return true;
}

public function insert($data, $table) {

$columns = "";
$values = "";
foreach ($data as $column => $value) {
$columns .= ($columns == "") ? "" : ", ";
$columns .= $column;
$values .= ($values == "") ? "" : ", ";
$values .= $value;
}

$sql = "insert into $table ($columns) values ($values)";
mysql_query($sql) or die(mysql_error());

return mysql_insert_id();
}
}

?>
Class User (User.class.php)
This class will identify each user. With the growth of this application the definition of “User” can vary significantly. Fortunately, OOP programming makes it easy to add additional user attributes.
Constructor
In this class we will use a constructor – it is a function which is automatically called when you create another copy of the class. This allows us to automatically publish some attributes after you create the project. In this class, the constructor will take a single argument: an associative array containing a row from the users table of our DB.
The code is below:
<?php
//User.class.php

require_once 'DB.class.php';

class User {
public $id;
public $username;
public $hashedPassword;
public $email;
public $joinDate;

function __construct($data) {
$this->id = (isset($data['id'])) ? $data['id'] : "";
$this->username = (isset($data['username'])) ? $data['username'] : "";
$this->hashedPassword = (isset($data['password'])) ? $data['password'] : "";
$this->email = (isset($data['email'])) ? $data['email'] : "";
$this->joinDate = (isset($data['join_date'])) ? $data['join_date'] : "";
}

public function save($isNewUser = false) {
//create a new database object.
$db = new DB();

//if the user is already registered and we're
//just updating their info.
if(!$isNewUser) {
//set the data array
$data = array(
"username" => "'$this->username'",
"password" => "'$this->hashedPassword'",
"email" => "'$this->email'"
);

//update the row in the database
$db->update($data, 'users', 'id = '.$this->id);
}else {
//if the user is being registered for the first time.
$data = array(
"username" => "'$this->username'",
"password" => "'$this->hashedPassword'",
"email" => "'$this->email'",
"join_date" => "'".date("Y-m-d H:i:s",time())."'"
);
$this->id = $db->insert($data, 'users');
$this->joinDate = time();
}
return true;
}
}
?>
Save information about users in the database
Save function is used to make changes to the database table with the current values in the User object. Using class variables, set the array $data. If the user’s data is saved for the first time, then $isNewUser is passed as $true (default is false).
Class UserTools.class.php
This class will contain functions that are related to users: login(), logout(), checkUsernameExists() and get(). But with the extension of this application, you can add many others.
Here is the code:
<?php

//UserTools.class.php
require_once 'User.class.php';
require_once 'DB.class.php';

class UserTools {

//Log the user in. First checks to see if the
//username and password match a row in the database.
//If it is successful, set the session variables
//and store the user object within.
public function login($username, $password)

{

$hashedPassword = md5($password);
$result = mysql_query("SELECT * FROM users WHERE username = '$username' AND
password = '$hashedPassword'");
if(mysql_num_rows($result) == 1)
{
$_SESSION["user"] = serialize(new User(mysql_fetch_assoc($result)));
$_SESSION["login_time"] = time();
$_SESSION["logged_in"] = 1;
return true;
}else{
return false;
}
}

//Log the user out. Destroy the session variables.
public function logout() {
unset($_SESSION['user']);
unset($_SESSION['login_time']);
unset($_SESSION['logged_in']);
session_destroy();
}
//Check to see if a username exists.
//This is called during registration to make sure all user names are unique.
public function checkUsernameExists($username) {
$result = mysql_query("select id from users where username='$username'");
if(mysql_num_rows($result) == 0)
{
return false;
}else{
return true;
}

}

//get a user
//returns a User object. Takes the users id as an input
public function get($id)
{
$db = new DB();
$result = $db->select('users', "id = $id");
return new User($result);
}
}

?>
The final backend touch: global.inc.php
global.inc.php is required for each page. Why? With its help, we place all conventional operations that we need on the page. For example, we will start session_start(). The connection to the database will also open.
Here is the code:
<?php
require_once 'classes/User.class.php';
require_once 'classes/UserTools.class.php';
require_once 'classes/DB.class.php';

//connect to the database
$db = new DB();
$db->connect();

//initialize UserTools object
$userTools = new UserTools();
//start the session

session_start();

//refresh session variables if logged in
if(isset($_SESSION['logged_in'])) {
$user = unserialize($_SESSION['user']);
$_SESSION['user'] = serialize($userTools->get($user->id));
}
?>
Now we are ready to create the visible part of the script if you still want to know how to develop a web app.
User registration (register.php)
In this page, we have two parts. The block of PHP code at the top, and HTML at the bottom.
<?php
//register.php

require_once 'includes/global.inc.php';

$username = "";
$password = "";
$password_confirm = "";
$email = "";
$error = "";

if(isset($_POST['submit-form'])) {

$username = $_POST['username'];
$password = $_POST['password'];
$password_confirm = $_POST['password-confirm'];
$email = $_POST['email'];

$success = true;
$userTools = new UserTools();

if($userTools->checkUsernameExists($username))
{
$error .= "That username is already taken.<br/> \n\r";
$success = false;
}

if($password != $password_confirm) {
$error .= "Passwords do not match.<br/> \n\r";
$success = false;
}

if($success)
{
$data['username'] = $username;
$data['password'] = md5($password);
 $data['email'] = $email;

$newUser = new User($data);

$newUser->save(true);

$userTools->login($username, $password);

header("Location: welcome.php");
}
}


?>
<html>
<head>
<title>Registration</title>
</head>
<body>
<?php echo ($error != "") ? $error : ""; ?>
<form action="register.php" method="post">

Username: <input type="text" value="<?php echo $username; ?>" name="username" /><br/>
Password: <input type="password" value="<?php echo $password; ?>" name="password" /><br/>
Password (confirm): <input type="password" value="<?php echo $password_confirm; ?>" name="password-confirm" /><br/>
E-Mail: <input type="text" value="<?php echo $email; ?>" name="email" /><br/>
<input type="submit" value="Register" name="submit-form" />
</form>
</body>
</html>
Entry and exit pages login.php
As in register.php, login.php will have a check at the top of the form and the form to entering below. The form consists of two fields. Everything is very easy and simple.
logout.php
The exit page is even easier. But this page does not need HTML. The function of this page is to exit the application by using the function logout().
The last file is index.php
In this file, you can do anything. Here you can post any links to information.
In this instruction, we tried to show all the steps of how to build a webapp. Still, when you need to develop a web application with many functions and exclusive design, it’s better to work with a development company, unless you are a programmer with many years of experience. Our company Letzgro is able to create any application on your choice. Work with professionals, choose Letzgro!